Do you have a dog? If so, then you know that at some point, you’re going to have to trim its nails. It’s important to do this properly, or you could cause your dog pain – and even infection. In this blog post, we’re going to teach you how to trim dog nails safely and properly!
In particular, we’ll cover topics such as:
- How often to trim nails;
- What tools to use;
- Average costs involved with cutting dog nails;
- What to do if your dog has black nails;
- How to deal with any potential complications;
- And more!
So, whether you’re a first-time dog owner or an aspiring dog groomer, read on for all the information you need to trim dog nails safely!
First thing’s first – why do dogs need their nails trimmed to begin with?
Well, for one thing, long nails can be uncomfortable for a dog to walk on. In addition, overgrown nails can affect the way your dog’s feet and legs are positioned. As a result, this can lead to potential health issues such as joint pain or arthritis over time.
Finally, overly long nails can lead to snagging, which can be painful (and potentially dangerous) for your pup.
So, it’s important to keep up with regular nail trimmings in order to maintain your pet’s health and comfort!

How Often Should You Trim Dog Nails?
In general, it’s recommended that you trim your dog’s nails every four to six weeks. However, this can vary depending on the breed and activity level of your pup.
If your dog is particularly active, then their nails may require more frequent trimmings. On the other hand, if they’re a bit less active, then you may be able to stretch out the trimming schedule a bit longer.
In any case, it’s always best to check your pup’s nails regularly to make sure they don’t need to be trimmed. If you notice that their nails are getting too long, then it’s time for a trim!
What is the Easiest Way to Trim Dog Nails?
Now that you know why it’s important to trim your dog’s nails, let’s talk about the best way to go about doing it…
Necessary Tools
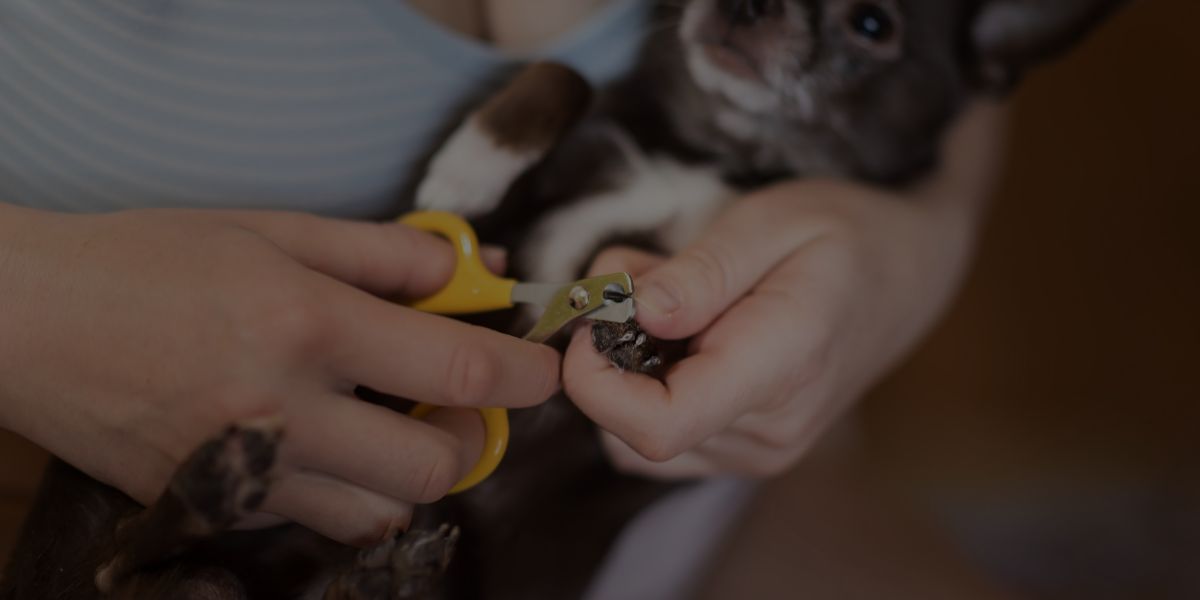
The simplest and most efficient way to trim a dog’s nails is with a clipper or trimmer specifically designed for dogs. There are several types of these available, including guillotine-style clippers, scissor-style trimmers, and even electric nail grinders.
(We’ll talk a bit more about grinders – also commonly known as a Dremel – later.)
Whichever type of tool you choose to use, make sure it’s sharp and in good condition – dull blades can be dangerous for your pup!
Important Considerations
It’s also important to select the right size tool for your dog. After all, you wouldn’t use nail clippers meant for a fully grown large breed on your tiny puppy… Or vice versa!
If you’re not sure which one is right for your pup, you can always consult with a professional groomer or vet to get the correct size.
Pro Tip: Thinking about getting your very first puppy? Discover the honest truth about what it’s REALLY like, so you know exactly what you can expect!
How to Cut a Dog’s Nails Without Hurting Them
Before we break down the steps on how to trim dog nails properly, there’s something super important we need to discuss first: the quick.
What is a Quick?
The “quick” is a nerve and blood vessel that runs through the center of a dog’s nail. And while you may not be able to see it, it’s best to assume that it’s there in order to avoid any potential pain or injury for your pup.

Does Cutting the Quick Hurt the Dog?
YES! Cutting the quick, or even coming close to it, is very painful for your pup. Imagine if you were cutting your own nails and went too far – that’s the same kind of pain for your dog!
If you accidentally cut the quick of your dog’s nail, they’ll likely yelp and pull away from you. They may even limp on that paw temporarily until the bleeding stops.
How Do You Know Where the Quick is on a Dog’s Nails?
In general, the quick will be more visible in light-colored nails. That said, you should still always err on the side of caution when trimming your pup’s nails. If you’re not 100% sure where it is, then just take a small snip at a time – that way you won’t risk accidentally cutting into it.
Personally, when trimming my Corgi’s nails, my rule of thumb is that I never cut into the pinkish part of her nail. I only ever cut the clear parts above the pinkish portion.
How to Find the Quick on Dog Nails
Now, if you want to make especially sure that you don’t accidentally hurt your pup, you may want to know 100% where the quick is BEFORE doing any trimming. We get it!
As we just mentioned above, the quick should be easy to spot if your dog has lighter-colored nails. Specifically, you’ll want to look for a pinkish-colored line running through the center of their nail.
If you take a look and still aren’t totally sure, you can always used a tool known as an LED nail grinder. This handy device emits a bright light that illuminates the quick inside your pup’s nails and allows you to see it before beginning any trimming.
Either way, once you know exactly where the nerve and blood vessels are, then you can start snipping away without worry.
How to Cut Dog Nails That are Black
Here’s where it gets a tiny bit trickier…
If your pup has darker nails, correctly locating where the quick is (and ends) can be tougher. In that case, you may want to use a special tool called a “Quick Finder“. This is essentially like an illuminated magnifying glass that will make it easier to spot the quick, even in darker nails.
Finally, once you have that identified, then you’ll follow the same steps as above to get the job done. And if you just don’t feel confident or comfortable enough to do it yourself, then you can always ask a professional groomer or vet for help!
What to Do if You Cut the Quick
In addition to not wanting to hurt your dog, another reason to actively avoid cutting the quick is if you’re squeamish about blood… Because when this happens, your dog will bleed.
If this does happen, don’t worry – it’s not that bad. Simply apply a bit of styptic powder (which you can buy online or at some pet stores) to the nail with a Q-tip and gently press down for around 30 seconds. This will help stop the bleeding quickly!
Pro Tip: Think a career in professional dog grooming would be the PERFECT path for you? This Ultimate Guide will break down how to become a fully trained, internationally-certified, working groomer in as little as 6 steps!
How to Cut Dog Nails at Home: A Step-by-Step Walkthrough
Now that we’ve gone over the basics of dog nail trimming, let’s take a look at how to actually do it:
Step 1: Gather Your Supplies
Before you start anything else, you’ll want to make sure you have everything ready to go. This includes:
- A pair of clippers or grinders
- Styptic powder (in case you accidentally cut the quick)
- Treats and/or other rewards for positive reinforcement
Step 2: Introduce Your Dog to the Equipment
If your pup has never had their nails clipped before, you’ll want to start by introducing them to the equipment. Let them sniff it and get used to it. This way, they don’t become too scared once it’s actually time to start cutting.
Step 3: Have Your Dog Sit or Lie Down
Once your pup is comfortable with the equipment, you can then have them sit or lie down. This will make the whole process much easier for both of you! Plus, make sure you’re in a comfortable place with plenty of light, too.
Step 4: Start With Just One Paw
Now it’s time to get started! Begin by picking up just one paw and inspecting the nail. Next, you’ll want to lightly press on the pad. Doing this will ensure that all of the nails are extended out so that they’re easier to clip.
Step 5: Begin Trimming
Now it’s time to start snipping! You can do this in one of two ways, depending on your preference. First, you can use a regular pair of clippers and cut off small pieces at a time until you reach the desired length. Or alternatively, you can use an electric grinder, which is a lot faster but also a bit more dangerous.
(Again, we’ll touch more on this in a bit!)

Step 6: Pause and Reward Your Dog
After each nail, it’s important to pause for a moment and reward your pup! This will help keep them calm and relaxed throughout the process. You can do this by giving them treats or simply speaking in an upbeat tone of voice.
Step 7: Repeat on the Other Paws
Once you’re done with one paw, move on to the next! And then just repeat the same steps until you’ve trimmed all of your pup’s nails.
Step 8: Cleanup Time
When you’re finished, it’s time to clean up any messes. This includes wiping up any spilled styptic powder and properly disposing of the clippings.
How to Trim Dog Nails as a Professional Groomer
Now, you may be reading this – not as a dog owner yourself, but as an aspiring groomer. In that case, let’s take a look at how trimming nails works for professionals. As you’ll see, while some of the steps are the same, there are a few key differences…
Step 1: Gather Your Supplies
Just like before, the first thing you’ll want to do is make sure you have all the necessary supplies ready to go. This includes clippers, grinders, styptic powder and rewards for positive reinforcement.
Pro Tip: Here are the BEST tools that every professional dog groomer needs in their arsenal!
Step 2: Have Your Client’s Dog Sit, Stand, or Lie Down on Your Grooming Table
The way your client’s pup sits, stands, or lies down will depend on what kind of grooming you’re performing. For example, if you’re just trimming nails then having them sit or lie down is recommended. However, if you’re giving a full-body groom then it may be best to have them stand.
Just note that if the grooming table is elevated, then you’ll need to have someone (such as a coworker) hold the pup while you work on their nails. Alternately, you can help them remain in place with a grooming loop.
Step 3: Secure the Dog’s Paw
Next, you’ll want to lightly press down on your pup’s paw to extend out the nails. As we mentioned before, this will make it easier for you to trim them.
Step 4: Begin Trimming
Now it’s time to start snipping! Again, you can use either clippers or an electric grinder – whichever is more comfortable for you. Just be sure to take off small pieces at a time, and be extra-careful not to cut too close.
Depending on the body language and temperament of your client’s dog, you may need to give them regular breaks throughout the nail trimming process. Remember: the pup’s comfort and safety always come first!
Step 5: Cleanup Time
Once you’re finished, it’s time to clean up any messes. This includes wiping down the table, disposing of the clippings, and even giving your client’s pup a belly rub or two!

How to Cut Dog Nails Without Clippers
Now let’s take a look at nail grinders – a.k.a. a Dremel. This is another common way to trim dog nails without using clippers. So, let’s learn a bit more about this tool!
What is a Dremel/Nail Grinder?
A Dremel (or nail grinder) is a tool that uses an electric rotary grinder to help shorten and shape pet nails. It’s fast and efficient, but it can also be a bit intimidating for some pets. So, it’s important to go slow and steady when using one!
How Does It Work?
In a nutshell, a Dremel works by rotating a stone cylinder over the dog’s nails. This will slowly grind down the nail to your desired length – no clippers required!
How to Trim Dog Nails with a Dremel
Once you have the grinder running, begin shaping your pup’s nails by gently filing away at them. You’ll want to start at the tip and work your way up towards the base, stopping when you reach a comfortable length. Afterwards, turn off the grinder and then use a styptic powder or cornstarch to help stop any bleeding.
Safety Considerations
As we mentioned earlier, a Dremel is a bit more intimidating for some pets. This can lead to more anxiety – which in turn can make them feel scared and nervous about the process. As such, it’s important to be extra patient when using one and provide plenty of positive reinforcement along the way.
Furthermore, grinders can be a bit harder to control and require more skill than clippers. If you’re not careful, it’s possible to take off too much nail – leading to discomfort and even pain for your pup. Thus, it’s important to practice on a stuffed animal or other non-living object first before moving on to real nails!
Lastly, nail grinders can get very hot during use. Meaning, you’ll need to make sure to keep your pup’s paw away from the grinder and take frequent breaks. Otherwise, you risk burning their toe and/or paw!
Frequently Asked Questions
Finally, let’s take a look at some of the most common questions pet owners ask when it comes to trimming their pup’s nails.
Q: Any tips on how to trim dog nails that are overgrown?
A:If your pup’s nails are overly long, then it can be helpful to start by cutting them back in stages. Start off with a small trim and then gradually work up to the desired length.
Q: Can you trim your dog’s nails yourself – or should you get a professional groomer to do it?
A: Ultimately, it depends on your comfort level and experience. If you’re new to the process or feel uncomfortable doing it yourself, then we recommend letting a professional groomer do it instead.
Pro Tip: Learn how to find the right dog groomer for YOU and your pup in just 5 simple steps!
Q: How far back do you trim a dog’s nails?
A: The goal is to only trim off the very tip of the nail. This will help prevent any discomfort or pain for your pup. So, be extra careful when cutting!
Q: What angle do you cut a dog’s nails at?
A: Generally speaking, you’ll want to cut at a 45-degree angle. This will help prevent overly long nails in the future and make sure they’re properly filed down.
Q: Does soaking a dog’s nails before cutting help at all?
A: Yes! Soaking your pup’s nails in warm water beforehand can help to soften them up and make the trimming process a bit easier. Just make sure to not leave them in for too long – or it can lead to irritation and pain.

Q: How much does it cost to trim dog nails?
A: The answer to this question depends on whether you plan to cut them at home, or pay a professional groomer to do it. Generally speaking, the cost for a DIY job ranges from $10-$100 – depending on the tools you wish to buy. Meanwhile, a professional groomer usually charges an average of $10-$25 per nail trim.
Q: Any tips on how to cut an uncooperative dog’s nails?
A: When it comes to uncooperative dogs, the best thing you can do is remain calm. Start by providing positive reinforcement and plenty of treats throughout the process. You’ll also want to break the trimming session up into smaller parts – taking frequent breaks in between each one.
Also, don’t forget to speak in a soothing voice and praise your pup for their good behavior!
Lastly, you may find it beneficial to distract them in some way. For instance, you can offer them a favorite toy, treat, or game – and use this as a way to get their mind off the task at hand.
Conclusion
Trimming your pup’s nails doesn’t have to be a stressful task. With the right tools and technique, you can get the job done in no time! Of course, it’s important to keep safety in mind at all times – so make sure to take plenty of breaks and follow the necessary steps for using any equipment. And if you ever feel uncomfortable, be sure to seek the help of a professional groomer!
Good luck – and happy trimming!

Your site and the information has been the best I’ve come across. KUDOS! I am so in love with my two doggies, but my life becomes bad when bath time, nail trim, or flea spray comes into focus to them. Especially my 8yr old Chihuahua!! I cannot express how grateful I am bc I think this upcoming trim will be best bc of you.